

You come across a crochet pattern that looks perfect for you to work this season. You spend a while picking yarns, you purchase the pattern (or just download it for free), you are full of excited anticipation, then you open the PDF file and – aww. No written instructions. Charts only.
I feel your pain.
Many crocheters avoid stitch charts, and rightly so—who in the sane mind would write in Ancient Egyptian when you can use normal human language. Crochet symbols are hieroglyphs. But you can read them. And, unlike Ancient Egyptian, it doesn’t take ages to learn. And trust me, you can even love them.
Why you should try
1. It’s fun!
Think snakes and ladders (maze puzzles, sudoku, crossword). Can you solve a maze entirely just by having a quick glance? Probably not. And if yes, would you really enjoy it?
Crocheting an item is a journey you have learned to love. Remember how you struggled to work your first stitches? And that was the hardest part, learning to read charts is not nearly as painful. Anyway, you can ditch it anytime and do text instructions—nothing to lose. But you’ll never know unless you try!
2. It’s a cool skill that empowers you to work nearly any pattern.
Written or charted—you no longer care. Even if the text instruction is written in a foreign language, you can manage as long as it has a chart and you know how to read it.
3. It’s a great tool that saves you lots of hard work.
Science has proved that our brain prefers images over text. Think news feed on social media. How often do you read/notice posts without pics? Think maps, infographics, traffic signs… Reading lots of text and keeping concentrated takes time and effort. Crocheting is a hobby, not a chore! Why work hard?
4. It helps you figure out the text instruction.
Written instructions can be unclear, inconsistent, ambiguous, or just have typos. Author is far more likely to make a typo in text rather than an error in the chart, and pattern testers can overlook it just the same. You have to send your query to designer or wait for the errata release. But if your text instruction comes with a chart, you have a better chance to solve the issues right away.
5. It only takes minutes to learn how it works.
You can’t solve a puzzle if not given clues. As soon as you know the rules and find where to start, a maze captures you and doesn’t let go until you go through. All the clues are there in the pattern. Just spare half an hour of your time, grab a cup of your favorite drink and prepare to savor your new adventure.
THE CLUES
A stitch chart (or stitch diagram) is a visual representation of crocheted stitches combined into a pattern. It looks very similar to the actual crocheted fabric or its separate elements.
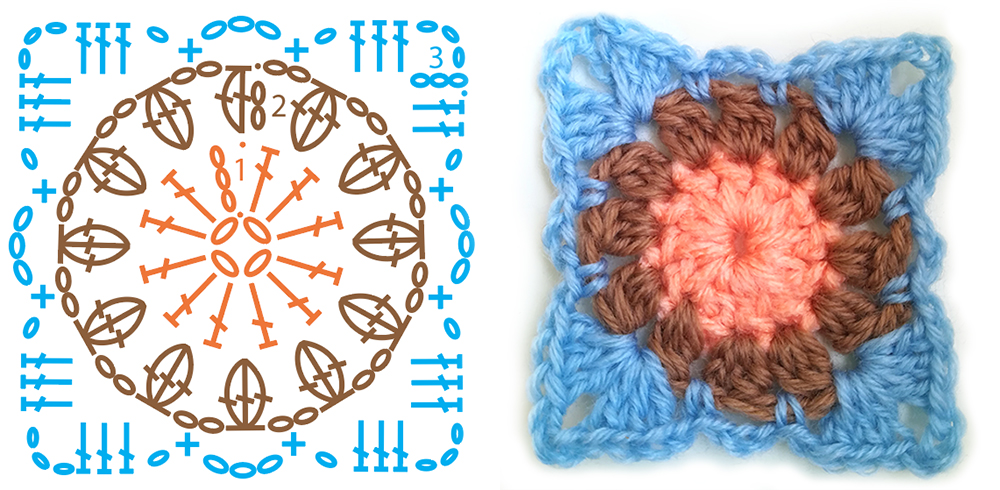
What you need to know is:
1. How to find the start point and get the direction
- When your pattern calls for working in rows, you start from the bottom and move up, in the right-to-left direction, alternating right-side (RS) and wrong-side (WS) rows. Think the same when you see the chart for a pattern worked in rows. The beginning is at the bottom, normally a sequence of chain stitches serving as the foundation chain (or base chain). Then you work the row above the foundation chain, then the next one above, and so on. Rows are normally numbered with an arrow indicating the working direction (if not, the rule of thumb is: you work each row right-to-left and build rows one upon another bottom-up).
- When your pattern calls for working in rounds, you start from the center and move in circular counterclockwise RS rounds outwards. The same applies to the chart. Search for a magic circle symbol or a circular sequence of chains with a slip stitch that joins them into the initial ring. Then each subsequent round appears as an outer layer to the previous round and is normally numbered, numbers may appear with arrows for working direction.
2. How to interpret each symbol
Key tells you what kind of stitch
Every chart has a key, or a legend, or a list of symbols with their meanings explained. There’s nothing to memorize: crochet chart symbols are standard and look very similar to the actual crocheted stitches they represent.
Chart tells you where to work this stitch into
Except for chain stitches that just hang in the air, every symbol indicates the spot (stitch or space) you are supposed to work the stitch into by standing right above it in the chart.
There are also other symbols provided with their explanation to help you navigate the charts.
3. How to interpret colors
Different colors are normally used to
- indicate RS and WS rows (e.g. “RS rows appear in black, WS rows appear in blue” is specified in the key or in the pattern notes);
- differentiate one round from the other;
- highlight stitches and/or rows to be repeated.
Sometimes chart symbols are colored after the actual colors used in the pattern. If the key or pattern notes do not include explicit instruction on the use of colors, take a couple of minutes to look at your chart, you’ll notice the logic quite quickly.
4. How to handle repeats
Most patterns call for repeating a specific number of stitches across the row and/or a specific number of entire rows. Repeats are normally specified explicitly by either color-coding the repeated sequence of stitches/rows or drawing a frame around the segment to be repeated. Some charts only consist of what needs to be repeated. Instruction on what to repeat and how many times should be included on the chart, in the legend, or in the pattern notes. Your eye gets better at spotting repeats as you practice more and more charted patterns.

Thank you for reading! I hope it was boring enough to show that a picture is worth a million words 😄 Tell me what you think in the comments!